FURNITURE

My blog is of my creations, My furniture, using wood I have collected from here and there, occasionally buying some to make up the difference.
My design is often based around what I have available.
Comments welcome, thanks for your visit.

My Trade Mark

My Trade Mark
I'm into diamonds

Thursday, November 8, 2012

Easy Peasy

 Looking back now, it was easy.
I think I have decided to leave the edges square, there is enough detail elsewhere.
Now all that is needed is a good fine sand and it is ready for a coat of lacquer.
As I say it all seemed so easy as I look back now, maybe it has something to do with knowing I can do it or that it does not matter if it all goes wrong and I bin it, it has only cost me time and it is time I spend to keep me busy and not idle, now I have too many tables around the house, but this one I will be happy to keep.

Sunday, November 4, 2012

V is for Victory

This is the forth table of this design I have made, the first ones were
all experiments one way or another, I have enjoyed having them
 around the house and being 3 legged works well when 1 leg is off the carpet and two legs are on the carpet it will not wobble.
I have now run out of material with only one table finished, I have enough pieces to do another top but nothing for the edges or the legs, it was a challenge squeezing these legs out of what I had available, the teak has a tendency to split if screwed too close to the end so there was a bit of gluing up happening.
I enjoy making the legs, they have a taper in the length and a single biscuit in the joint I glued on a temperary clamping block on that I cleaned of once the joint was made and the glue dry.
The top is 580mm across the flats or 23in for those who still use them, and 415mm high in inches that is 16.5 if I can be excused for mixing decimal with imperial.

Friday, October 19, 2012

A random choice

 This is the first of two tops that I will make, that is if I make them both the same, as I said in the earlier blog this has all come out of left over scraps so the grain of the pieces could not be matched in anyway I picked up the pieces randomly as I glued up the smaller hexagons and to my eye at the moment looks very disorganised, a characteristic of teak is that it changes colour as it is exposed to the air and much of what is seen here is freshly cut wood, the thickness of the teak is now about 4mm and I have vacuum pressed it to 18mm mdf, I belive the only glue to fully work in a vac bag is epoxy so that is what I used but in the joining up of the Teak I used a polyurethane foaming glue.
My next move is to trim the edges and clash them with a widedownstand that I will give a bit of shape to, then my standard design of 3 legs.
There are 36 hexagons each with 3 dimonds so that is 108 pieces, if you look closely some of them around the edge are half dimonds.
As I worked my way through the process of gluing the small hexagons together I found that the small error I mentioned in the last blog was manifesting itself and I had to build it one piece at a time in order to get all the points coming together as they should, for the photo I gave the teak a wipe with a damp cloth to bring out the colour and it has had a very rough sand to get it flat.

Sunday, September 30, 2012

A Lot of Bits

 
I took my time setting up to cut the diamonds and as a result it looks like I have a positive outcome. The picture shows the cramping block I made being used with 4 cramps on it, it shows all the loose diamonds ready for gluing together and in the back ground the first few hexagons I have glued together, most of the pieces are 10 mm thick a few are 18 mm thick, as I glue up the hexagons I am gluing a thick paper to the back I intend to glue a thick paper to the front then split the hexagons in half so I will have twice as many, I may get 2 tables out of this.
I am finding I have a discrepancy over the 3 widths of .1 of a mm, I am also finding if I put 2 hexes together a 3rd is not the snug fit I would have liked into the recess, there is a long way to go yet and it’s a lot of pieces there could be some sweat over this one, so when I say positive outcome I think it could have been worse

Sunday, September 23, 2012

Waste not


I have had a bucket of teak off cuts in the garage for about 6 years, another boat job its waste from the deck.


As a lot of it is narrow and short I can only see myself joining lots of pieces together, I have long thought of a hexagon table but with smaller diamonds hence a lot more of them, see the July 2010 post I have made 3 tables using different timbers the diamonds are about 85mm wide this time I am thinking 45mm wide so that is about 90mm over the hexagon as is the sample I have made.
I can see the challenge is going to be getting each hexagon accurate enough so any inaccuracy does not compound itself. 
I so much wanted to post a video of the computer desk but it would seem it was too big to publish.

Sunday, September 2, 2012

A finished work of art

What started of as using up a piece of left over wood has become a feature of the room.

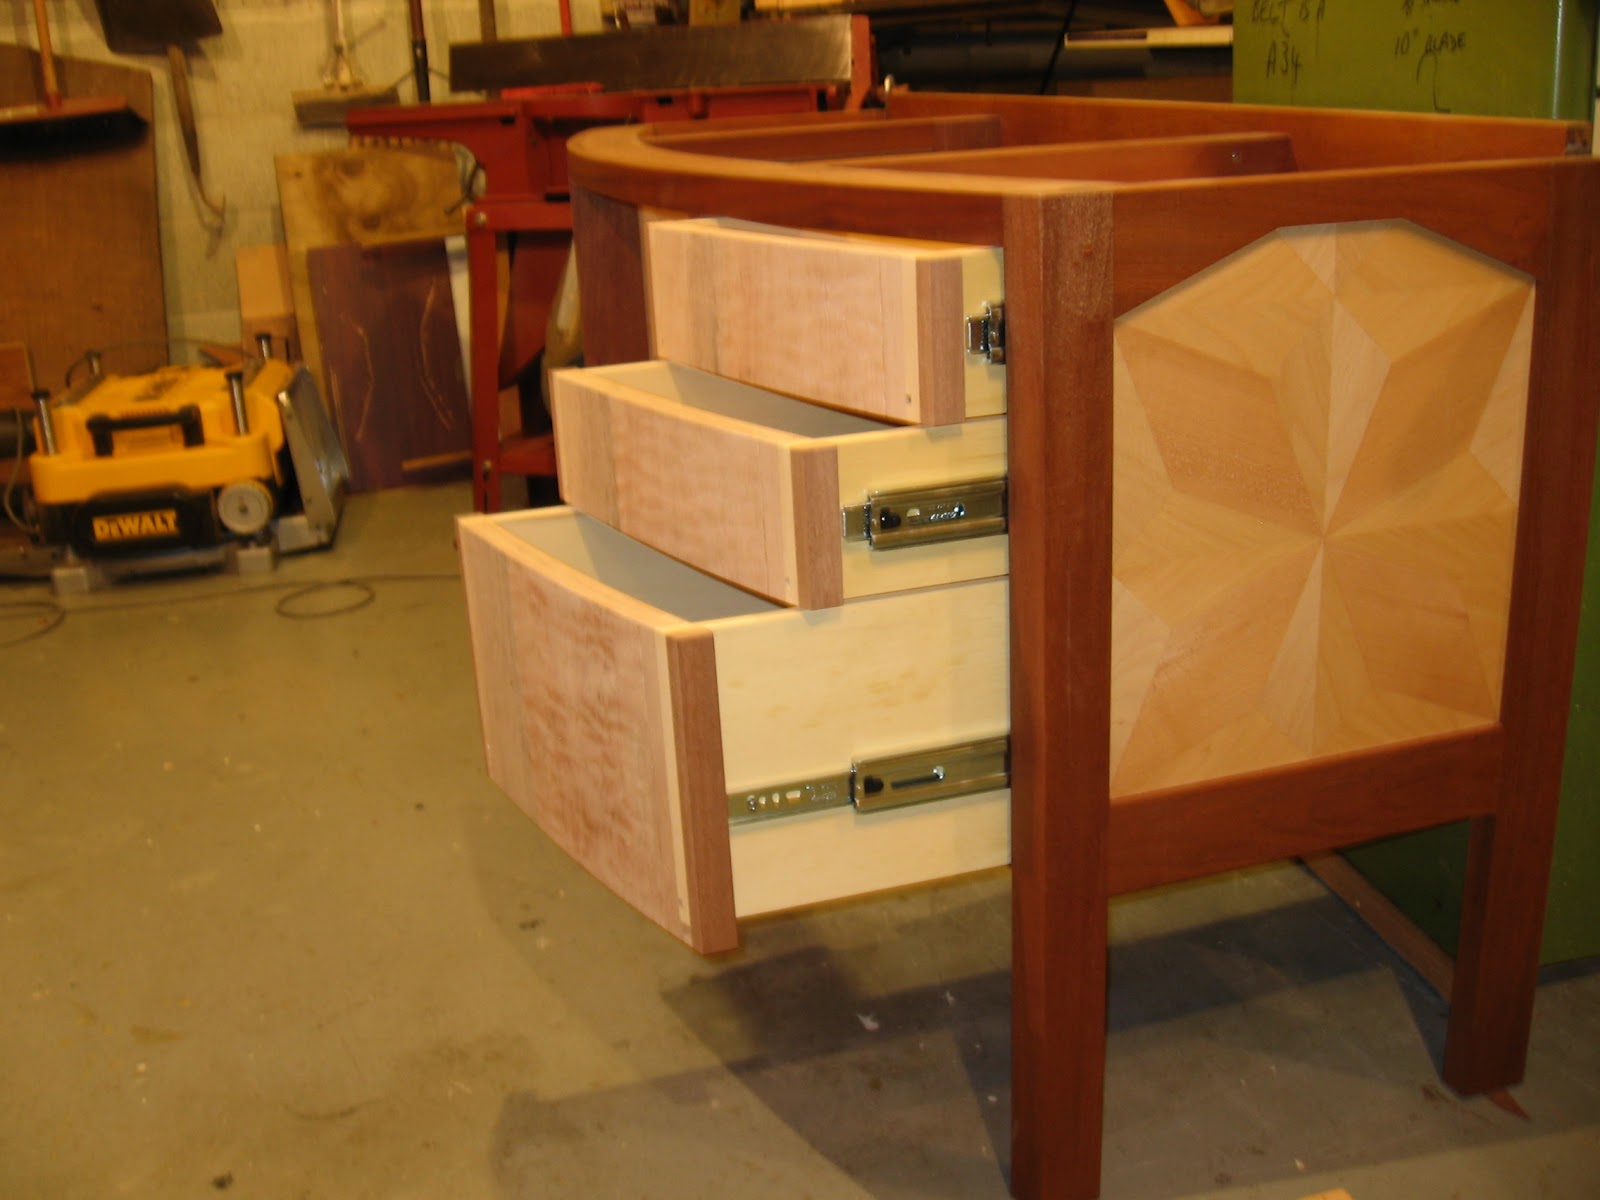
The curved piece of Mahogany on the front edge of the desk top was left over from a boat building job and I just had to find a use for it, the patterns on the end of the desk was something I had seen in a newspaper and was longing to use somewhere, the veneer on the draw fronts would have been thrown out and there was no waste what so ever as I made the draws to fit what I had, some of the European Beach was free, but still I have spent about $1000 on this piece and a lot of time. I am thinking of a slide out keyboard table to match the top it will have the same banding to the edge and maybe a mini version of the pattern that is on the top. I would also like to put a tray in one of the deep draws, it is the sewing materials draw so it could be just for the cottons and pins, it all sounds a bit obsolete these days.

Sunday, July 29, 2012

Draws Draws and Draws


I decided to put these draws on steel runners and of course they need room, I did think the draws were going to be small and by sacrificing 24mm in width I have kept maximum height in the draws, then I had to close off the gap that they create this I have done with a piece of Mahogany, the fronts will be veneered with a quilted Mahogany and edged with a 1mm veneer so the fronts will look solid Mahogany, the base is 3 thicknesses of 6mm bendy ply with a 3mm dress ply on the inside, this was layed up on a former using a vacuum bag.
It has been fun going through the process of attaching the fronts to the sides and keeping them all flush, now the challenge is to get that veneer on and be flush with the frame around the draws.
The end is neigh, I want to attach the handles with a biscuit so there are still some anxious moments to come.