FURNITURE

My blog is of my creations, My furniture, using wood I have collected from here and there, occasionally buying some to make up the difference.
My design is often based around what I have available.
Comments welcome, thanks for your visit.

My Trade Mark

My Trade Mark
I'm into diamonds

Monday, February 28, 2022

I Don't know what it is

Other than me seeing an idea and wanting to try making it this has no use at all, I have had fun making it and there are a few things I have tried for the first time.

The process has involved me making 2 of the top pieces so the fun is not over yet, I will soon start to make a base for the second one.

When I first saw something similar it did look impossible which is what drew me to having a go, the one I saw was in a dark wood it was also photographed at an angle that made it difficult to see how it had been made

I chose a light wood thinking that this one was just an experiment and that I would use some dark wood at a later date.

The base is made of another native wood of New Zealand and is turned to 2mm thick where the piercing is, the piercing is all new to me, I won't go into the difficulties I encountered but to say I am pleased with the results even if I was 3 days doing it, anything good takes time.

My statement of this having no use is not true as I do like to see it and brings me pleasure just knowing that I have done what at first looked impossible.


Friday, December 31, 2021

Just for the Record

 I was asked to make a yarn bowl again, this one was a great success
so I set about making one with some embellishment to take to the market, the wood is totara but being a young tree it is pale so the embellishment has helped lift it to another level.

The colour I used is some tints I have for use in fiberglass gelcoat for this reason I have used a rattle tin to put a clear coat on it.

The texturing is done with a micro motor carver, I also used pyrogrophy for some of the patterns.


Spinning out of control to a finish

 And this is what happened in the end, I finished it with a gloss rattle can so it is all shinny which does not come through in the photo.

There was an exhibition happening as I finished it so it went up on the wall there.


Friday, November 12, 2021

Two years on

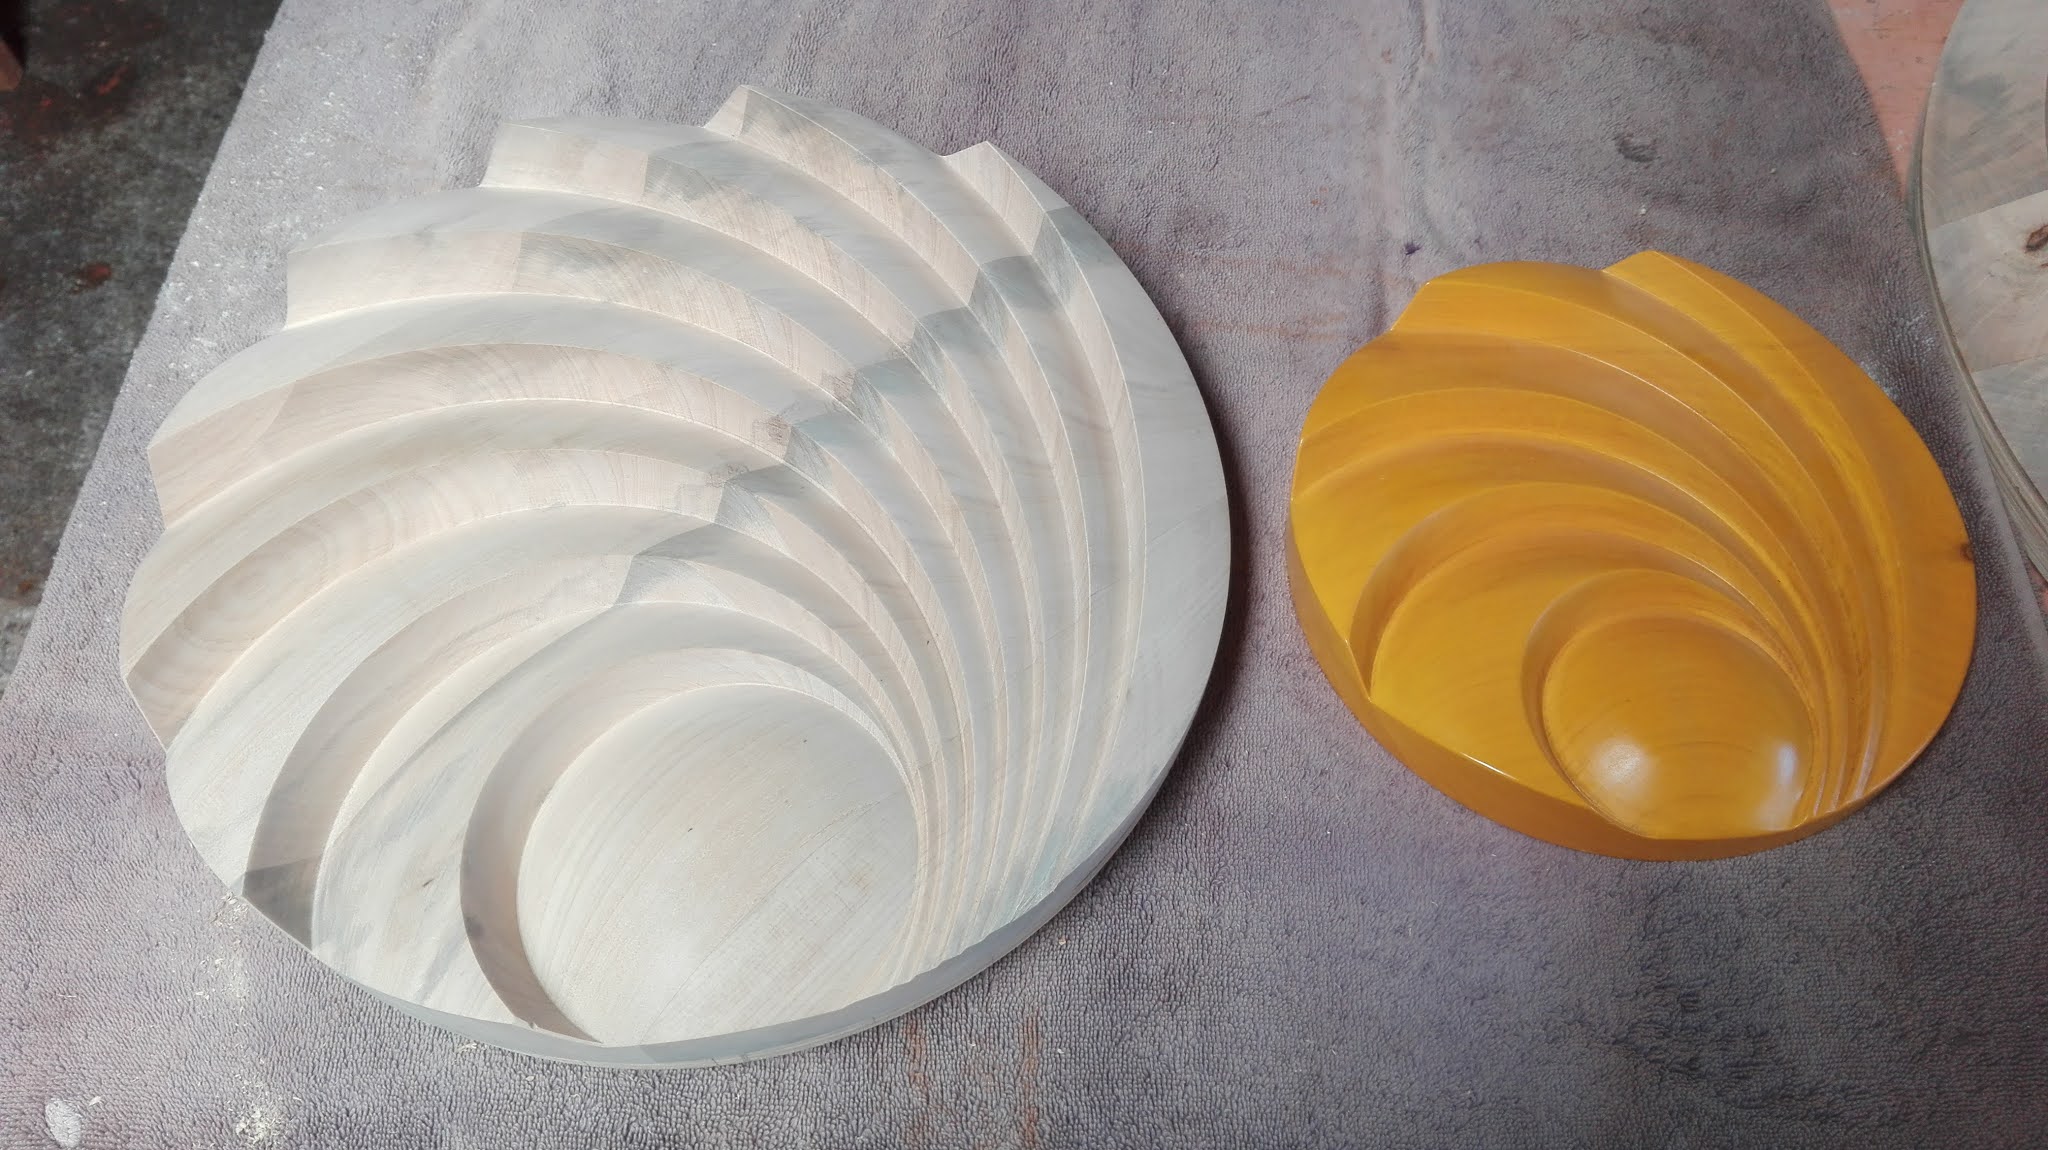
Past and present

 Its just over 2 years since I made a Saueracker shell and painted it yellow, last week I started to fulfill my promise to make another and a larger one, this one is 350mm across but in order to make this I had to start with a piece of wood 600mm across it also has to have a backing board glued to it, all in all it took me 3 days to prepare the wood before I could put it on the wood lathe, it was too big to turn it as I would normally so I had to turn the head of my lathe to the side, it is a heavy piece so I started at a slow speed until I became comfortable and had the piece balanced.


I first saw a picture of this on The Canadian Woodworkers web site I was thankful that Lisa Chemerika posted the instructions, this time I went back to TCWW site and the instructions were still available, even with instructions it is not all plain sailing, there is a lot of stopping the lathe and looking at what I had done, stopping the lathe with such a large heavy piece traveling at 600 rpm is also not easy I needed leather gloves when I went to hold the hand wheel on the back of the lathe that acts as the brake

The first action is to turn the eye that is in the center when that is done and sanded the whole piece is removed from the lathe the 350mm piece that becomes the shell is unscrewed and rotated about 40mm when it is returned to the lathe the second part is turned, there are 8 parts to be turned so each time the whole piece is removed the shell rotated before it is screwed back in place and returned to the lathe, there was 3 days of turning involved, my days are short but it was a slow process.


The wood I have used is Tawa a New Zealand native that is heavy easy to cut but very plane so I have started to process of embellishment which will become another post here.

I have the choice of using the outer crescent but at the moment I have no intention of using it. 

Sunday, September 26, 2021

Better than I saw

I was trawling through a wood turning web site and saw a very good idea


I instantly knew how to make them, then as I started I knew how to make them differently to what I had seen.

What I saw did not have the stalk at the top or the pear type look where the stalk comes from, what I saw was called a leaf I am thinking of mine as being an avocado cross pear.

What I like is that I can make quite a large piece from some smaller pieces and that it soaks up a lot of time that is constantly rewarding.

In order to put some strength in the stalk I have put 2 veneers on each side of the stripe each veneer is .6 of a mm thick and 2 together is 1.2mm you would need to enlarge the pictures to see them I guess.

I think there are a lot of possibilities in what I can do with that wavy line as you can see there is a left and a right hand curve in the photos, I do enjoy forming the dish area on the wood lathe as I like to get the big under cut around the edge, there is also a lot of hand work away from the lathe when I form the rounded edge, one of them has a square edge I think the rounded edge is much softer than the square edge.

The white pieces are Tawa with a swamp Matai stripe and lid the darker piece is Rimu with a stripe of Lancewood the lid is Elm burl, the overall size is about 300mm long, about 230mm wide, they all start off as 50mm rough sawn wood so are a little under that plus the lid so they must stand about 60mm high.

The swamp Matai used in those striped could be thousands of years old as it was buried under 3meters of river silt in a very wide valley where the river must have changed course many times over a very
long time, the Rimu would be quite old too, the Tawa was a wind fall.



Thursday, July 8, 2021

Rewarewa Rocking Chair Finished

 Funny how all the sanding and dust is so easily forgotten, how all the thoughts of is this or that correct, because I had so very little wood to play with and I had to go looking for more I at one point thought I may have to make it more 2 tone, as it is the back braces are laminated from rimu on both faces and tawa on the inside.

The rockers are laminated from rimu, tawa and rewarewa, I made the effort to position the laminates for the best effect, I am well pleased with the end result.

There are a few differences from the previous 2 chairs, the top of the back legs was kept thicker in the initial stage and now flow down from the head rest without interruption, the outer edge of the arm rest has a more swept up look that leads into a better scallop at the back of the arm rest, the seat was molded in a different way and has resulted in a more comfortable supportive feel, the piece of wood the seat came from was very thick so from the side view looks to be substantial at the front I had to remove wood from the underside and I was able to achieve a good looking roll where the side blends into the front.  the front legs were cut out of one piece of wood so there is no joint in the wood as there is in most of this style of chair.

Again the finish is Osmo oil, it has resulted in the rewarewa and the rimu looking very much the same colour and while the tawa is white it does not add the contrast that I thought it would, this is wood and there is always the unknown.


Saturday, June 26, 2021

Chair number 3

 I could say its finished but its not.

I still have some radius to put on the back braces and a lot of sanding to do then some finish to apply, this all looks possible in about another week.

The Rewarewa is prone to having cracks within the wood it must be what happens as it is drying, I was hoping that I was going to be able to work them out as I cut the wood away to form the shape there are also more worm holes than I would have likes but as it says on the tin this is wood, you could not get authentic worm holes in plastic.

Because the rough wood was thicker than normal I have been able to make this chair different to the previous 2 chairs, different does not mean better but it was good to have the extra thickness and experiment with what I could do.


 I am pleased I put some thought into the laminates of the rockers as I think they look very nice, the Osmo oil I will use to finish with will bring out the colours which will help with the contrast.

Due to a slight mistake the outside edge of the arm rest is high and to my eye it is nice, the mistake may be staying in the plans if there is going to be another chair one day.


No two chairs are alike either through mistake or through design trial and error this makes the whole building experience more enjoyable.


It is such a thrill to have got this far, now that it is all glued up and all of the joints have come together better than in the past I know this because it was easier to clean up the joints once the glue had dried, I also feel the effect of the investments I have made in new machinery as everything happens easier, quicker and with less noise.