FURNITURE

My blog is of my creations, My furniture, using wood I have collected from here and there, occasionally buying some to make up the difference.
My design is often based around what I have available.
Comments welcome, thanks for your visit.

My Trade Mark

My Trade Mark
I'm into diamonds

Wednesday, March 1, 2023

The summer that wasn't

 It has been the strangest of summers, just so so wet, I had made the decision to put more effort into my turning so to take longer to make anything by exploring decorations.

This decision came about in a number of ways firstly I can now turn out a round and brown in a short time but what to do with them then, I had started to sell at the markets as a way of having less of them in boxes but it is not easy to sell and has become a frustration packing and unpacking and not selling anything, It was the right time to stop given that we have had such a wet summer and a lot of markets were canceled.

Sitting out in my man cave either carving or wood burning is something I can do no matter what the weather, I have jumped about from one design to another wanting to try all sorts of ideas I see and putting my twist on them, each one teaches me something or most likely more than one thing the possibilities are endless, time or maybe the cost of the equipment I use are the only limitations other than my imagination.

In order for the embellishment to be seen the bowl needs to be high sided so some of my recent bowls have been large, I had picked up this piece of pohutukawa that finished at 200mm wide and just suited having the inside embellished, the pyrography on all these pieces is a fairly clean thing to be doing this is in contrast to the carving that I have been doing, I thing the carving is more of a challenge as it is more 3D however I have carved away plan A a few times now and started on plan B so that is an advantage to the carving.

This piece started off by just showing the growth rings and carving the soft wood away between the winter growth then I wanted to explore what I could do between on those flat areas, paint is another medium that needs a lot of exploring and again the possibilities are endless.

One last piece that I have spent a lot of time on, the wood had a lot of cracks in it that I worked glue into for fear that it could fly apart as I was turning it, being such a deep piece of wood and having cracks around the base gave me reason to form 4 feet on it the same applied to the 2 handles they were the only bits of good wood around the top, the whole of this is carved and painted.


Saturday, December 17, 2022

I am back at the lathe

 A few months ago I was asked to refinish a table top for a lady, then we had Art in the Garden a 3 day event that took 3 days to set up then another 3 to pack up, as soon as that was over I was asked to make an urn in a hurry, I then had a table and 5 chairs to totally dismantle sand off all old varnish glue it all back together and re finish that all took a while to do since I finished that we have opened the wood turners club room to the public each weekend hoping for some new members.

It was at the last club open day that someone turned up and gave me 2 blocks of wood, this is the result of what I did with the first one, it is 260mm wide and 90mm high the pattern is burnt on using a pyrography machine, the finish is from a rattle can.

Prior to being dragged away from turning I had done another piece that I have not shown here and is worth posting just for the record, carving feet onto the bottom of bowls was at first a bit daunting however now I have done a few it no longer seems such an ordeal and the result is rewarding, this piece is based on the Ginkgo leave, as part of carving the feet I also carved away leaving the leaf and stalk proud I then stippled the area and painted it the veins of the leaves are done with pyrography, the size is 205mm wide and 85mm high.


Sunday, July 31, 2022

I Wanted To

 I wanted to do a segmented turned piece for a long time, at first I thought I would glue it all together then hollow it out but then why make it difficult when I could glue up 2 halves a top and a bottom I could turn out the inside of both and have it as a top and a bottom, opening, I had thought I would leave a hole in the top but then realised how good a finial would look on it, the row of pieces where the joint is was glued on thicker so I was able to form a rebate to hold the top in place.


The pattern in the top is something I had left over from something else I did, it has sat around for a long time just asking to be used, this come about because I had done another piece and used a similar pattern around the edge that had been very successful, that plate is 245mm across and 45mm high.

Both of these pieces have taught me a lot, one of the things I consistently learn is to just get started, with the plate I did some drawings and cut a few pieces trying to work out how to cut that edging, the next few days were busy with an exhibition but when I came back to it fresh it all fell into place, everything is glued together using PVA glue.

The finial is made using swamp matai that is likely to be thousands of years old, the white wood is tawa another NZ native the dark wood is some wood I have been given but I have no idea what it is, its size is 240mm across the widest point to the bottom of the finial it is 140mm and the finial is 100mm so this is a big piece of work, I added the handles because the lid is a tight fit and I needed something to hold as I remove the lid.

The finish is Osmo Oil

Thursday, June 23, 2022

Ex Inani

 A few post ago I posted a smaller version of this, that one was the first I had made I said at the time I would make another one and here it is.

The first one is much finer thinner walled and lighter, this one being thicker and of heavy wood needed a more robust base I also liked the idea of it being able to swing in its mounting in fact by removing the top pin the feature piece can be removed the base turned to face the other direction then the feature remounted top to bottom.

Both the feature and the base were made on the wood lathe, the semi circle white wood that holds the feature is made by laminating 6 pieces of wood together each piece being 2mm thick, within this piece is a bit of everything I like to do, the wood turning, wood bending and laminating, the carving on the base and the pyrogrophy on the base.

The feature piece is Walnut the white curved mounting piece is Tawa and the base is Rimu, the piece stands 440mm high and 300mm wide.

Unless collecting dust is useful this has no use what so ever, however I will enjoy looking at it, tomorrow it will be put in an art exhibition that for me is an extension to the fun I had making it


Tuesday, June 21, 2022

Spring Time

 Another copy, well its a copy with my slant and improvements made to the one I saw,

now it looks different as now it has bigger hand on the clock, the base has been carved and coloured to look like grass, the spring and base have had a few coats of rattle can lacquer.

The piece I saw only had 3 coils to its spring, he had painted his base and spring green his clock face was white with a small clock set into the flower so it had numbers.

However this is my version, it was at first a daunting challenge, the good part was that the guy who I have copied had shown how he had formed the spring so while it all took a long time to make some of the brain storming was taken out of it.

I did not want to show a clock face so I bought a clock mechanism that I have had to house into the back and make a cover for.

I have glued the spring into the base but the clock face lifts off the spring, and yes it does spring.


Wednesday, June 1, 2022

Second chance

 My wood turning buddy was given a heavy dry piece of wood he was probably given it because it had big splits in it from the drying process, the wood is pohutukawa a New Zealand native that is well known for splitting as it dries.

My buddy had screwed it onto a face plate and began to turn it on his wood lathe, it was evidentially out of balance and sheered all the screws it leapt off the lathe hitting him on the wrist  leaving him to nurse a wound, he wanted nothing else to do with the wood so dumped it on my man cave floor warning me of the screws still in the wood.

After a few weeks I picked it up and routered out a recess so I could hold it with a lathe chuck, once on the lathe I cut around the screws and removed them, as I turned a bowl the extent of the splits became evident I pondered what to do and settled on turning it thin and piercing away the split areas it then became apparent that it could become 2 halves and putting another bowl inside became an option, then I wanted to see through as much as possible and see the contrasting light wood of the inner bowl (rimu), there was a slight plan but I was never quite sure just how possible it was until I had done it.

 I was at least the third person to consider using this on a lathe I think I have done it justice, it has taken a long time but then good things are worth waiting for.

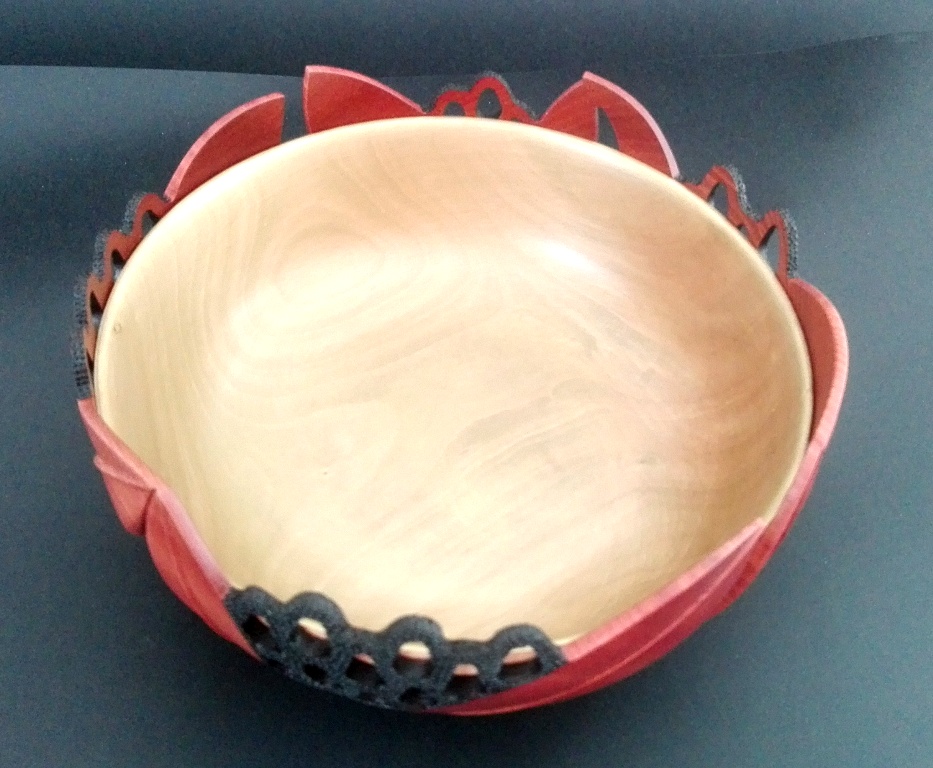
It is 190mm diameter and 95mm high, the black part is pyrogrophy using a ball tipped nib, as the heat was applied the resin would bubble out of the wood and scorch, the finish is satin from a rattle can, inside the bowl I applied a gold guilders paste before I lacquered it.


Sunday, April 10, 2022


 I watched a online wood turning demonstration of a lady who turned a bowl to 1.5mm thick wall she then showed how she went about piecing it in a pattern, some of it she left solid and painted it with flowers, during the demonstration someone asked if she had thought about doing a tree, this is my idea of that tree.

This tree is made in 3 parts I first turned the outer branches so it was like turning a large cup, the top of the wall was about 3mm thick and it was after I had started doing the piercing that I realised how thick the lower part of the wall was and the bottom, by then it was too late to change however in the end it all worked out well, next I turned the tree trunk not knowing what I would do I left the top and bottom parts big, I had always wondered if I could do an inner and an outer to the branches, only one thing to do, try it, I set about turning a long narrow cup and again I ended up with it too thick in the bottom, it was when I was doing the sculpturing after I had done the piecing that I was pleased I had that thickness, as I have never done this before it was all trial and error I did constantly think don't rush there was no time limit, eventually I glued the outer branches to the trunk I was then able to continue the sculpturing, I am still able to return the whole piece to the wood lathe which I had done so I could drill right through the trunk and cut a small recess for

the inner branches to sit in, it was about this time I decided to put a small LED light in the top of the trunk so I went shopping for a light, the root ball was another experiment that just grew (pun intended) and turned out as good as I could hope for, I did not want to leave the trunk plain but also did not want to sculpture it, I had seen a pyrogrophy pattern I liked and wanted to try making the wire nib for the pen, because of my previous experiments I have had a lot of luck with one, the whole pattern I am so happy about, it was a mistake that I put some gold paste on the trunk as I coloured the branches but when I saw the look of the gold over the pyrogrophy I put the idea of sanding it off away and continued the gold over the whole trunk, I have purposely left some of the black lines showing, the root ball is ebonised then the whole tree is lacquered using a rattle can.

This tree stands 250mm tall and the wood is rimu.