FURNITURE

My blog is of my creations, My furniture, using wood I have collected from here and there, occasionally buying some to make up the difference.
My design is often based around what I have available.
Comments welcome, thanks for your visit.

My Trade Mark

My Trade Mark
I'm into diamonds

Thursday, December 27, 2018

Different Bowls

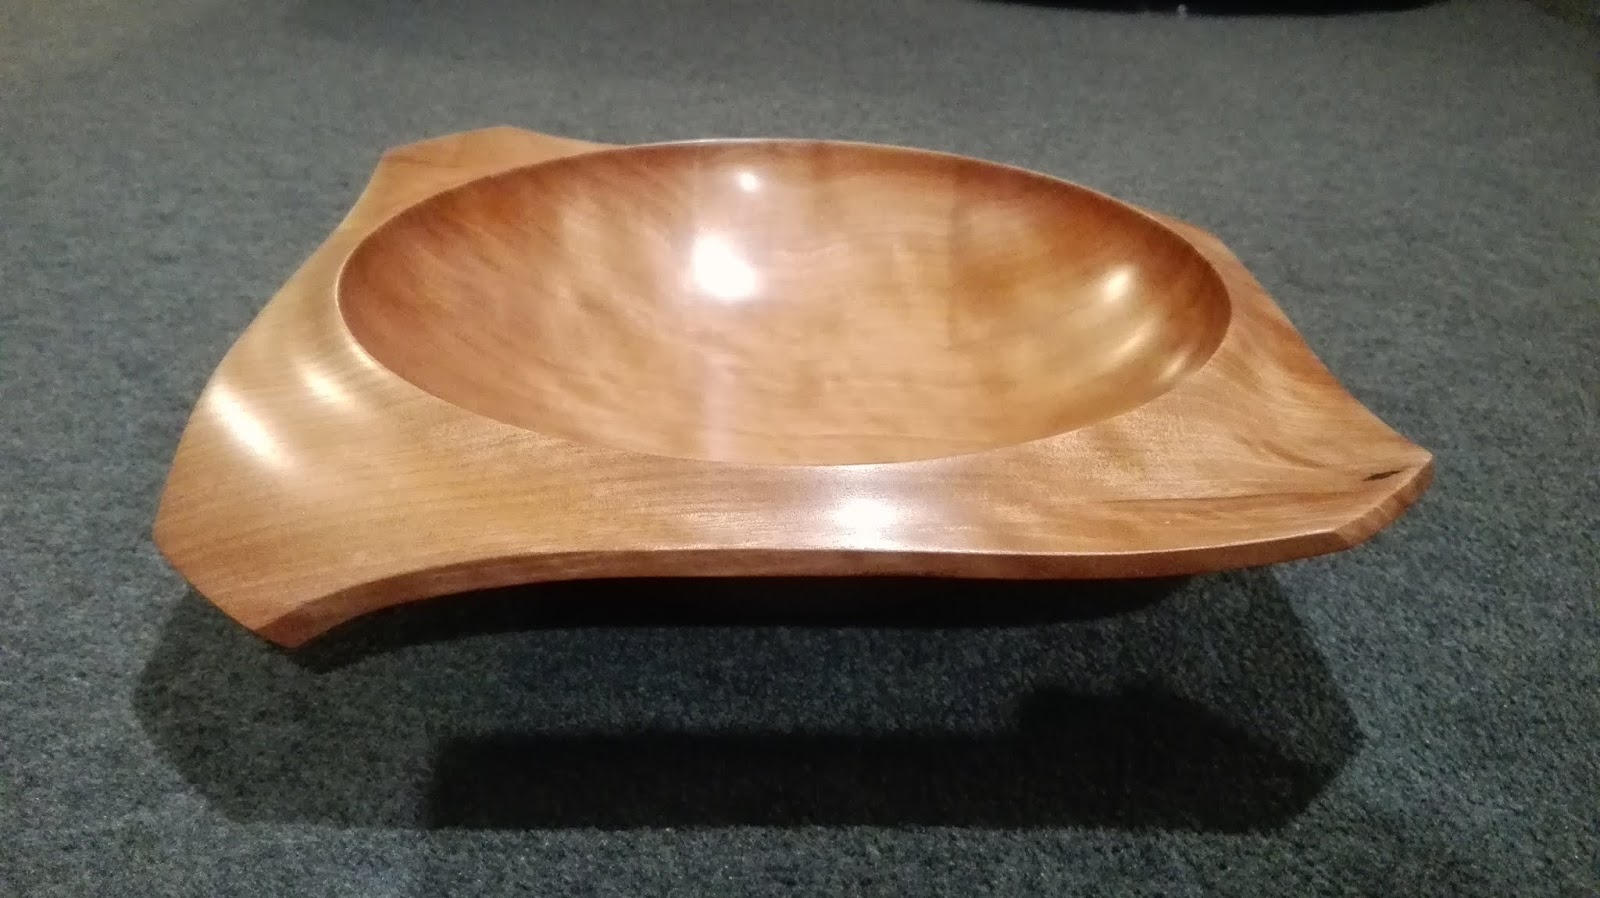
I got lucky and was given some large pieces of wood, the first was a piece of pohutukawa, this bowl is 270mm wide and 60mm high the blank I was given was much bigger but had a split through it so the easiest way was to put the axe through it and see where the split went, I don't like to waste wood so it told me to leave it square then there was some bits on those wings I wanted to remove so this is where it took me, I have seen this type of design called manta ray as in the swimming stingray type creature, it was a lot of work but worth the effort as it is a nice piece of wood.


The second piece of wood I was given was not so thick but a far bigger diameter, the platter has turned out to be 520 diameter and about43mm high, it was very difficult to sand as it instantly clogged up the sandpaper, that alone should have told me what the wood is the smell was there but I could not believe I would be given such a wonderful piece of kauri, most kauri I have come across has not been so colorful being almost mono colour this piece is different.
There were some voids that became bigger as I dug out the bark or
loose wood then to be filled with epoxy and wood dust so again a while in the making and the biggest piece I have turned.

Saturday, December 1, 2018

New Wood

The wood is new to me, it had become too big at the bottom of a neighbors garden, its a Rimu tree and maybe 60 years old and for that kind of tree its young so I don't expect to find any great colour in it, I have been slowly cutting it up and rough turning it I have about 6 pieces turned and in cardboard boxes drying now.
I gained some dry Tawa, nice clean white Tawa, it is 8" X 2" I cut a piece off and turned it into a platter with wings just to see the quality of it, the one on the right is Matai and came from the local beach so a piece of drift wood, all these timbers are native to New Zealand.
I know people like rustic but I also like to achieve a good looking finish to what I turn so I am torn between leaving in the natural flows or trying to produce perfect pieces of wood which is very rare given that wood is so prone to movement, the Matai has some splits while the Tawa is perfect.
I have been working on some bowls I turned wet during the year, the one on the right is Elm Burl and is 8 1/4" diameter, now it is dry it is hard and nice to work with, the back one is Pohutukawa another New Zealand native timber this piece is 10" diameter a few cracks have appeared that I glued up as I went along so there were a few day work involved with this one, the bowl on the left is Cherry
a piece of wood I exchanged for some of my Elm Burl it was dry but split, I cut the block by the split, machined a good surface and glued the 2 pieces together before I turned a shape again I found shakes in the wood that had to be glued up before the final turning, all these pieces have been rewarding to get to a final point.


Friday, November 9, 2018

Sphere

I have made spheres before both solid and hollow, the hollow one I glued together
for ease of sanding, I wanted to do something that looked like a Celtic knot so I decided to combined all three a hollow sphere that came apart with a Celtic knot inlay.
It is 94mm outer diameter with a wall of about 3or 4mm and as round as a wood lathe can get it.
The wood I used is Totara for the main part and the inlay is Tawa, both are old and very dry.
It has been a week in the making as I could only glue in one inlay a day and there were 8 to glue in, if I got up early I could get 2 glued in a day.
Yesterday and today were turning days, today it fell on the floor twice so there has been some moments of panic when I thought I had to start all over again.
The dark patches are glue that I have had to put on due to cracks and I hope to sand it out if the whole thing does not disintegrate when I am finishing it. 


Monday, August 20, 2018

Pine for a wood show

There is a wood show coming up next month at a small town not far
away, I have visited these last 3 years, now this year I am in to either sell or compete with other turners, most of the work I have priced high hoping not to sell as it is of the best work I have done, as for wining, if I do I will be happy, if I don't well we will have to wait and see, I have not made any great effort as I consider I am learning and there is a lot of learning to do, as we know beauty is in the eye of the beholder and for the most part I am happy with what I do.
This is Pinus Radiata there is a category for it in the show so this is my effort, a design I wanted to try, it is sat on the 4 outer feet and the middle is suspended about 6mm clear, I intend to leave it as natural wood no finish coating.
To me it looks like a dog bowl and I have called it this for the show, I was given the wood as a huge log as it was cut from the tree trunk, it has been sat drying for over a year and turned easily.
My other entry's I have shown in past posts.

Saturday, August 18, 2018

I've been turning wood

I was given a lump of Japanese Walnut that has been stored inside for years so was bone dry and covered in dust making it difficult to see what I had been given, I could see some splits in the wood so cut off that end a put it on the lathe this bowl is 200mm wide and 70mm high this size enabled me to take a small bowl out of the inside.
The colours are some of the best I have ever seen in wood, someone saying a galactic scene.
I did glue up the cracks but it was easy to turn and is very light given its size, I have a piece that will give me 2 more bowls so now I look forward to seeing what that reveals.


Wednesday, August 1, 2018

Chooks, tail feathers and bowls

We now have 2 chickens in the bottom corner of our garden, I built a run and chicken house out of left overs from house renovations, I think these are black orpingtons chickens, one of them was laying eggs as soon as we got her then one day the neighbors dog barked and she had to go see what the noise was about, over the fence she went it must have been right into the waiting dog as she lost her tail feathers before she found their wood shed to hide in, we only got one more egg now I think the experience has put her off laying for a few days.
I have been standing in a shower of wet wood shavings for a few days rough turning wet wood for it to dry I wanted to do some finer work and took some thin scraps I thought were a bit useless along with a piece that had sap wood.
I wanted to see if I could do hollow form by gluing 2 pieces together, 3 of the pieces I had were only 20mm thick so with a slight hollow became the bottoms and one top, these pieces are 220mm diameter the tall one is 63mm and the unfinished one stands at 53mm including the ring I glued on, at present I am contemplating how to hold the bowl on the lathe while I finish the top ring.
The wood is not entirely dry, there was movement overnight while I turned them so the wood has become very thin as I had to re turn turn them, they now make a good drum.
I wanted to make the opening large enough to be able to see the grain of the wood inside the other one won't be so big but then the grain of the wood is better on the top.


Monday, July 23, 2018

Elm Burling

I have been extremely lucky to find someone with an Alaskan Mill
to slab the burl for me, I cut off the bits that were sticking out and have started to cut them up and rough out some bowls, one piece that  was protruding was the remains of the trunk.
I didn't have to push the chainsaw mill so it looked easy it was my job to put wedges in the back side and stop the piece already cut from dropping down.
We first cut the top flat that gave us a tapered piece then 2 at 100mm thick and 2 at 75mm thick all the rest was cut to 50mm thick and that was about 5 pieces so in all about 9 pieces and some bits, the good man who did the cutting took 2 for his efforts.
Now they are all sticked up in a pile drying, that is with 2 sticks between each slab to allow air to pass through and the drying to take place
I have been cutting up the bits and rough turning bowls, it is a learning experience, as I am turning them it is good to see the colour return but then quickly fades again as the surface water dries out.
I am unsure how much movement will occur during drying so have been leaving plenty of thickness, I have weighed each one and written on them the weight it has only been a few weeks and already I can tell the difference in weight.
The smaller ones seen here are what I cored from inside the bigger ones.


Thursday, July 5, 2018

A round wheel

The hardest part of creating a round object is getting it round,that is round without flats or lumps and bumps that you can feel more than see, and from what I can tell I have done it.
The old wheel has finger holes on the back side, well not holes but slight hollows to improve grip, I was unsure how to do this but thought I would see if just sand paper was enough, I wrapped some course sandpaper around a plastic pipe of about 70mm diameter and it proved to be just right, I marked around the outer edge of the wheel an even 40 points determined by the 10 hollows on the 1/4 of old wheel I have I then cramped straight edges across the wheel so I could sand a hollow on each side of the wheel this entailed moving my straight edges 20 times but stood in the garden in the warm sun on a cold winters day listening to the birds sing what could be better.
 
After all the hollows were sanded out I was back inside the man cave with the router and a large radius bit taking off the corners with the fear that I may get splintering from the wood being under tension, I got a good result and very little sanding was needed.
Next I will give it a coat of 2 pot epoxy treatment with the hope it will prevent worm attack then a coat of polyurethane.

Sunday, July 1, 2018

Getting around to it.

I was asked at the beginning of the year to make a steering wheel for an old Chevrolet truck, the truck is a mess and standing in a barn on a farm, the farmer says he will restore it some day but to me its a challenge so I am now getting around to it with the hope it will eventually be used for its intended purpose, the original wheel is now in 4 pieces and riddled with wood worm, I think it was hickory and it must have been steam bent as its not laminated and its not made in sections.
The farmer gave me a block of wood 1m X 70mm X 150mm it had a reddish look to it very straight fine grain that I think is maranti, I have taken 27 pieces off the side and thicknessed them to 2mm successfully with no break out, the wheel is 457mm over all diameter.
I have cut some 18mm MDF using the router to 420mm diameter using a 12mm cutter so the inner cut is 408mm I then doubled up on the MDF and once the glue was dry I flush cut the 2nd piece to match the first, I am wondering if the 37mm difference between what I want and what my jig is will allow for the spring back of the lamination (tomorrow I will know).
The 12mm of cut the router cutter made has allowed me to lay up 6 2mm pieces using epoxy, today it all went to plan for the glue up using a fine tooth spreader I was able to spread the glue very even and at a minimum so there is very little squeeze out and I kept it a very clean job, always best when using epoxy.
My plan is to make 4 and depending on the amount of spring that happens tomorrow will tell me how to make number 3 and 4, when I glue them together I intend to stagger the joint on the 1/4.


The first layups have become the inner pieces of the wheel I have increased the outer diameter of the jig and am now in the process of laying up the outer pieces then its a matter of bringing them all together.

Saturday, June 23, 2018

Quite a week

Last week I offered to make some clock surrounds for our local miniature railway club, someone had given me a piece of a Norfolk Pine tree and it has been stood drying for a while now, I cut of enough to dress up a stick of 4 x 2 and made 2 of these, with them screwed to a board I was able to turn them to fit the plastic clock, seen here they have some exterior grade stain protection on them, they will be mounter back to back above the railway station just like the real thing.  


Next project was to make a sister to the last bowl I showed
the new one is on the left, it stands a little higher at 120mm high and 160mm wide at the top, again the bottom part is glued to the top but was actually taken from inside the top part, the wood is Tawa that is spalted so the black lines are a mould or fungus that  was causing the wood to rot.

While this was happening I was also playing with another piece of Norfolk Pine trying to create a plant pot stand, I made it to fit the plant in the picture, after it was finished I decided it needed feet so it has 4 feet made from Purple Hart turned to look like balls, the darkness inside the bowl is a waterproof coating should we ever over water the plant, the finish to the rest of the wood is a wax.

Then at the end of the week came the big surprise a phone call with the offer of a freshly cut burl from a Weeping Elm, it is much bigger than I had expected and has me wondering what I will do with it all, I was very eager to find out what it looked like inside so on Saturday with a fresh chain on the chain saw it was amazingly easy to cut and find out what is inside, I did get one piece on the wood lathe, with water and chips flying around I rough turned a bowl that is now sat in its own wet wood chips in a cardboard box with the hope it will dry slowly with no adverse effects, the colour is just wonderful and I hope one day to cut it differently so I can show off the burl effects


Tuesday, June 5, 2018

Spalted drift wood

I have been walking the local beaches eyeing up the drift wood again, this is spalted Tawa, spalting is the early stage of rot, this piece started  much larger I turned it on the lathe till I was down to solid wood but still there was a soft spot running through it that I tried to harden using an epoxy treatment I was not happy so cut the top half off leaving me with about 55mm it was then I realised I could take out the center and glue it on the bottom giving me what you see here.
The total height is 105mm and 165mm over all across the top.


To have a better look click on the image.


Wednesday, May 23, 2018

Some bowls

Its nice to be back at my lathe.
I went up the beach a few days ago and picked up some drift wood of course it was wet so I set about turning some wood I had that was dry, the two smaller ones were very dry, the front one is rewa rewa while the one behind I am not sure about, the large platter on the right is matai, a piece of drift wood I picked up last year and has been drying undercover, its overall width is 310mm X 45mm high and all very exciting to turn.


I did cut into the wet drift I had picked up to see what was inside and decided to turn 2 pieces then give it a chance to dry before I finish it some time in the future from what I can tell the wood is a Totara and will polish up very nicely one day but is still very heavy with water.
The back piece will be a light stand, the lower portion will remain in its rough state, the front piece will be some sort of bowl and will eventually be deeper than it is right now there is a lot to do with them when I get started again.


So I went back to some dry wood and decided on a piece of kauri that someone had given to me, as I made the first cuts I was most surprised at the green tinge to the wood it is also very tight grain so a very slow growing tree I can see about 200 growth rings in this piece of wood so that is 200 years old, the bowl is about 220mm wide and given that these trees can be 2 and 3 meters wide the tree this bowl came from could be over 2000 years old.
I formed the outer shape of the bowl and sanded it then set about taking out the middle saving the inner piece for another bowl.
The wood was a pleasure to work with though there are a few hairline cracks in it but this is what happens with wood.
I still have the pleasure of making something out of the inner piece and may yet get a smaller one from inside that.


The bowl on the left is one I have had for a few years it was shop bought and has held a lot of fruit waiting to be eaten, what ever the coating was it had become dirty and dull looking, the bowl is also kauri and more to the colour that I know as kauri its grain is not as tight as the one on the right.
I put some time into finding a center and created a hollow in the bottom to hold it on my lathe, as I first ran the lathe it became obvious it was not round so using a chisel would have destroyed the bowl my only option was to sand it clean some turps was tried but had little effect, with time and lots of sandpaper I have a bowl better than when it was new and I am so pleased now I have made the effort.


Acacia is a hard wood to work with, this piece was a small piece but large enough to save the middle with my coring tool.
there were some voids in the wood so I dug out the soft wood and filled the hole with epoxy and black pepper corns the fun happened when I came to sand the cured epoxy and could smell the pepper.
I had finished the bowl before I decided to try putting the piece that came out of the bowl under it as a foot, I also wanted the insert a piece of something as a contrast, the contrast is not great the wood is I think tawa but as its first life was a weatherboard on a house I am not sure it would be tawa, all in all it was a pleasing project and a few things have been learnt along with turning experience gained.